
Introduction
This article is an introductory guide to the key terms and definitions related to requirements management in IBM DOORS Next, including artifacts, modules, collections, and base artifacts. In the article, we emphasize the importance of understanding the relationship and differences between base and module artifacts and discuss important considerations and potential problems highlighted in use-case scenarios.
This article is written with the intent of providing comprehensive information regardless of your current level of expertise with IBM DOORS Next. We will be working with modules from one of the DOORS default templates, Automated Meter Reader, but the examples are not content-specific, you can use any modules to follow the scenarios analogously.
Before we begin – Basic terms and definitions
Artifact - a general term for any entity that is part of a project. It can be a requirement, text, diagram, heading, business goal, picture, table, document, etc...
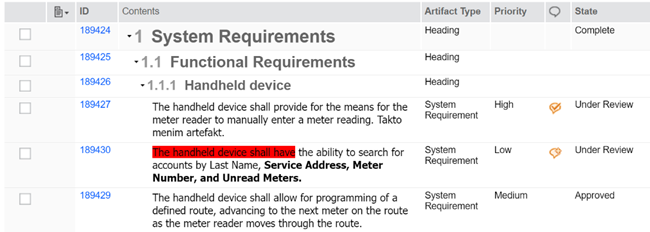
Module - a special type of artifact that contains other artifacts in structured hierarchical order. It is used to catalog and manage requirements specifications in a structured, easy-to-use document. From an end-user perspective, it has the look and feel of an excellent combination of a document and a spreadsheet that is easy to use and navigate.

1.) Module Hierarchy View Example
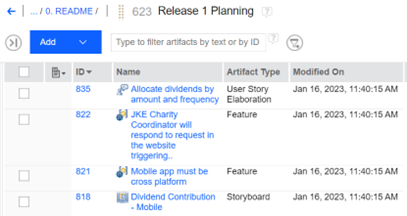
Collection is an unordered group of artifacts that has no particular structure. You can pick and choose artifacts to create a set of artifacts with a common purpose or focus. Collections are used any time we need to create a set of related artifacts. It can be a collection of artifacts for a backlog, iteration, sprint, or collection based on ownership functionality,...

2.) Collection Example
Module artifacts may represent two different entities.
- It can be an artifact that has the type „module“ – as described earlier, a module is a special format of artifact that contains other artifacts in a structured form and hierarchical order.
- It can be an artifact that is created/inserted/uploaded or used in the module. In this document, we will use this definition of module artifact.
Base artifact - an artifact that can be created and managed independently from a module and shared in multiple contexts. Every base artifact is stored in its respective base artifacts folder, which contains an unstructured set of all created artifacts.
Relationships and differences between base and module artifacts.
Every module artifact has its corresponding base artifact, but not every base artifact must have its corresponding module artifact. If you are working with artifacts inside a module, you are working with the module artifact, whereas if you are working with an artifact outside a module, you are working with the base artifact.
When an artifact is created in the module, the base artifact is created automatically, sharing most of its content, such as title and text, attributes... There are only 3 exceptions that are not propagated from the module artifact to the base artifact – links, comments, and tags. Module artifacts also have section attributes, which are unique to module artifacts.
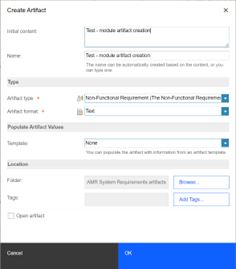
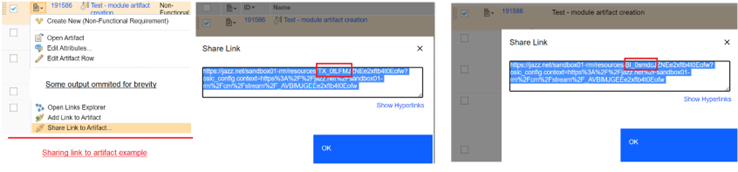
The background process for the creation of module artifacts is as follows:
- Creation of artifacts in the module – Image 3
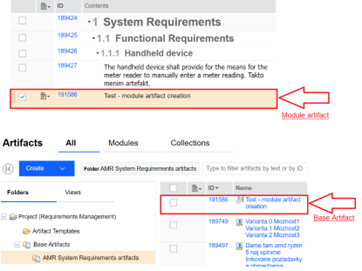
- The artifact was created with ID #191586 - Image 4
Although created in the module, this artifact is created both as the base artifact as well as the module artifact. - On the backend, the artifact is created as the base artifact, and the new module artifact is embedded into the module.


Interesting fact - Even though both artifacts have the same ID number, they have two separate entries in the database, which can be seen in Image 5, displaying differences in the link to the artifacts.

5.) Differences in the artifact links
Relationship between base and module artifacts
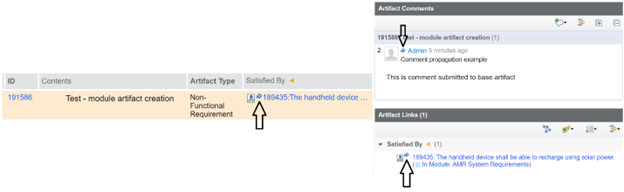
Base and module artifacts share almost all of their content, such as attributes, titles, and text. Any time a change is made to one of the artifacts, this change is automatically propagated to the second artifact. The only three exceptions are links, comments, and tags that are not propagated from the module artifact to the base artifact. It works, however the other way around – comments, links, and tags added to the base artifact are propagated to the module artifact. This example is shown in image 6. The small blue arrow in the example represents information that a link/comment was added to the base artifact and was propagated to the module artifact.

6.) Link and comment propagation from base artifact to module artifact
Why it is important to know the relationship and differences
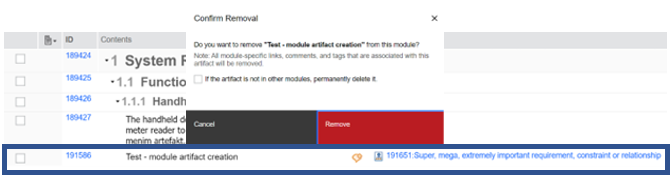
One possible scenario depicting why it is important to know the differences, relationships and propagation limitations is a use-case where module artifact #191586 was deleted (either by design or as user error). If this requirement in this artifact was important and needs to be added back to the module, one might add it back from base artifacts, where there is still its base artifact counterpart that was not deleted. After all, any changes to the artifact are propagated between base and module artifacts, so it should be its perfect copy, right? Below in images 7 and 8 is an example process of the deleting of the artifact and the restoration of its base artifact counterpart from the base artifacts folder.

7.) Module artifact deletion

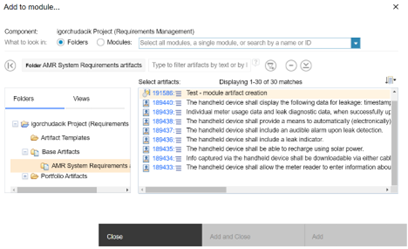
8.) Adding artifact back to the module from base artifacts
The result of this addition is shown below – we successfully added the previously deleted artifact and now it is safely back in the module where it belongs. Excellent right? WRONG!

9.) Module artifact after its addition from the base artifact
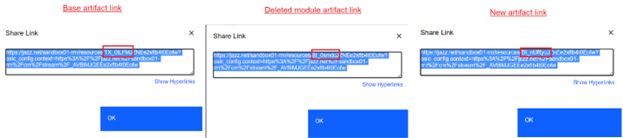
Even though it may seem we added back the deleted artifact, it is, in fact, a new module artifact, with a new entry in the database, as shown in Image 10 below – observe that the URL to this newly added artifact is different from the base artifact as well as the old (deleted module artifact).
10.) Differences in the artifacts links

Although interesting, that itself is information that is nice to know, but not a deal breaker.
The real problem is the previous statement: „After all, any changes to the artifact are propagated between base and module artifacts, so it should be its perfect copy, right?“ That statement is not entirely correct. As previously mentioned - it is true, that most of the artifact content is propagated between the base and module artifact, however there are three exceptions – links, comments, and tags, that are not propagated from the module artifact to the base artifact. If the module artifact had any important comments or links defining any kind of important relationship with another artifact, those links/comments were not propagated to the base artifact and therefore were forever lost after the deletion of the module artifact.
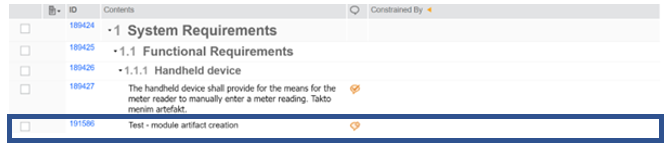
Observe in image 11, that the newly added artifact does not have a link to „Super, mega, extremely important requirement, constraint or relationship“. Not knowing about this constraint may have a huge impact on the entire project.
11.) Differences between deleted and new module artifacts
Example of good practice in using links and comments with base and module artifacts
A good practice is having clearly defined rules and guidelines for documenting what artifacts will be used in a company or a project. It may be a simple guideline to never work with the base artifacts, or it may be a more detailed elucidation of specific situations when use of base artifacts is preferred and why.
To make the right decision, the most important thing is to know about their similarities, differences and limitations. Although there is no simple answer to this question, as it is use-case specific, the next simplified example may help you:
- If a comment and/or link to the artifact has its value just in the module context, it may be added only to the module.

12.) Module-specific comment on the artifact
- If a comment and/or link to the artifact reference requirement is important regardless of context or specific module, it should be added to the base requirement.

13.) Project impacting comment on the requirement
Another example of a different approach to the usage of base artifacts and module artifacts is managing the requirements and documents. Although the majority of customers use modules (and therefore module artifacts) for requirements management from the start, there are companies that record every requirement one by one as a base artifact, and after that they create a document structure and use modules to document requirements.
Next important use case for using artifacts primarily as base artifacts are files such as images, attachments, pdfs... Those files are primarily stored and managed in the folders and from there they are embedded into the modules. In the next example, we will explain, why it is beneficial to work with images as base artifacts and why “embedded links” are important to provide traceability and a single source of truth.
Scenario - Working files and embedded links
In this scenario, our goal is to upload a new image to the project and use it in different modules in different ways. We will upload the image to one module as a new artifact while in the second module, we will embed the image into the existing artifact without a traceability link and finally, in the third module we will embed the image into the existing artifact with the embedded link type.
Step 1 - Create a new folder
As mentioned earlier, files such as images, documents, videos, emails, etc. are primarily stored and managed in the folders, and from there they are embedded into the modules. In the first step, we will create such a folder.
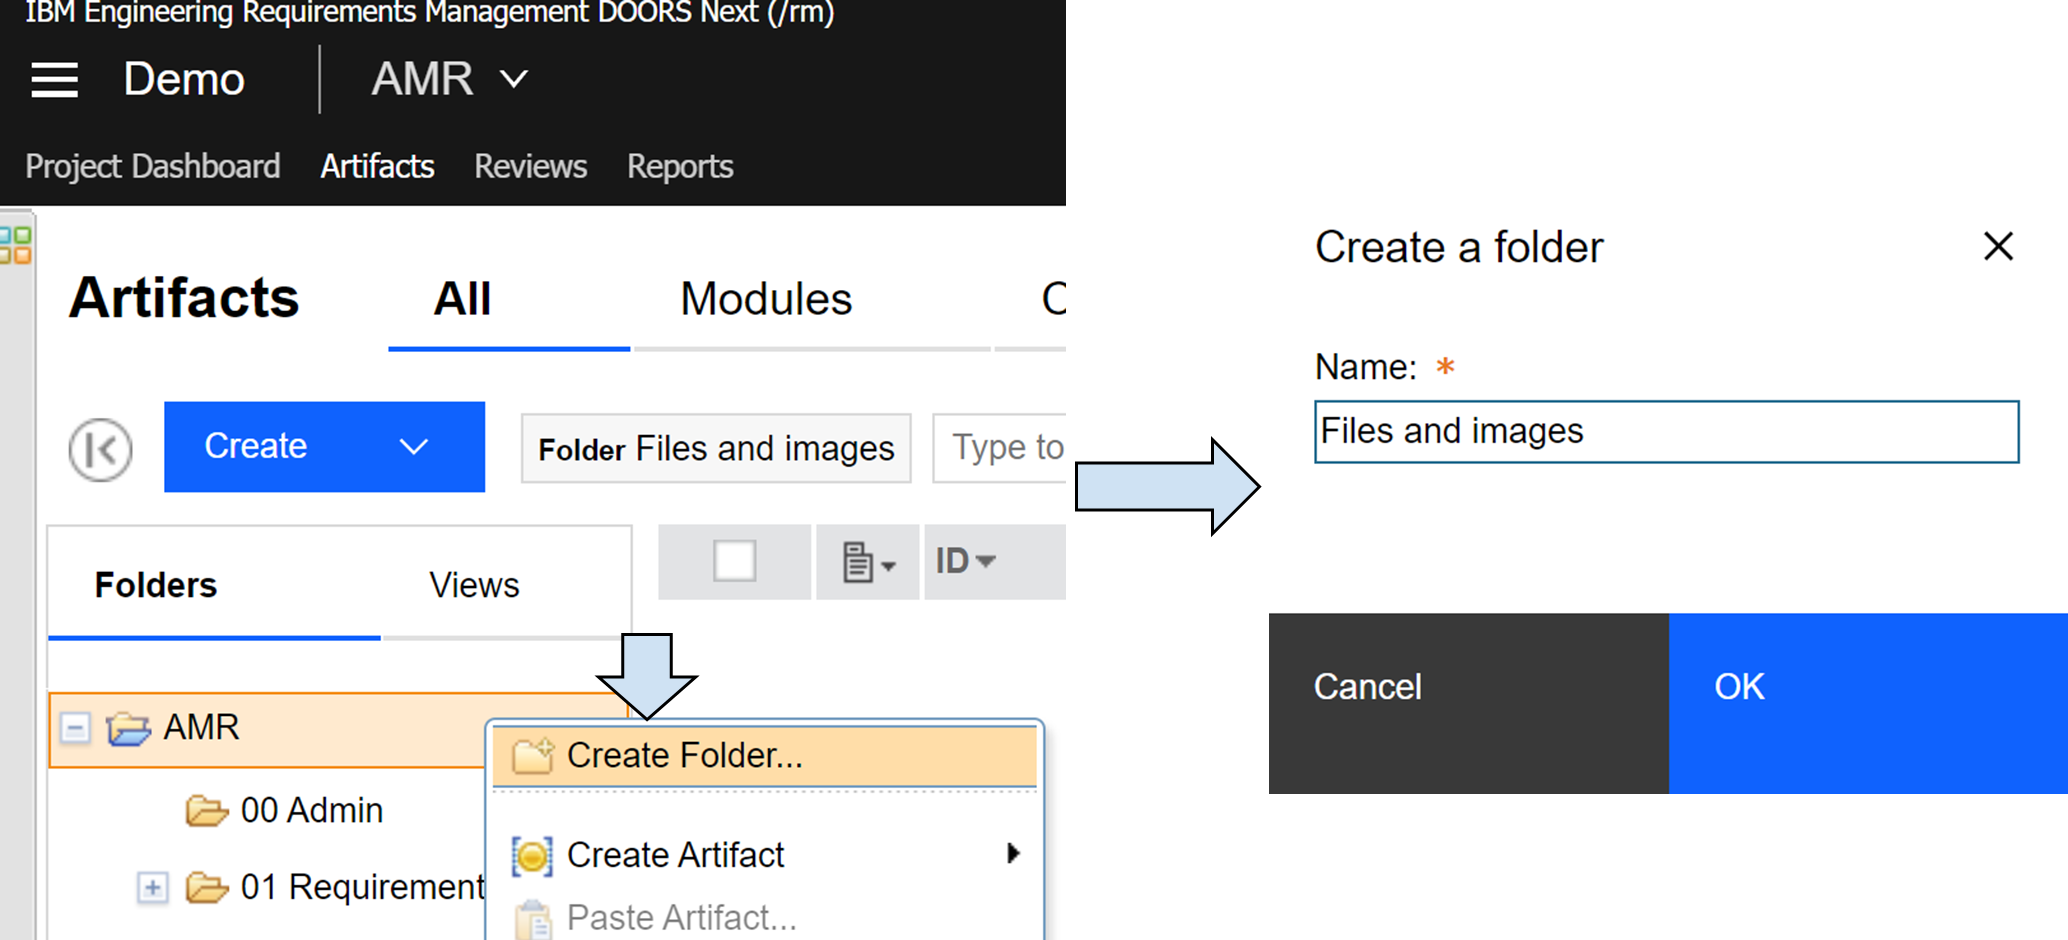
Navigate to the Artifacts and select All. Next, right-click on the folder under which you would like to create the new folder - in our scenario, we will create the new folder directly under the AMR project folder.

14.) Create a folder
Step 2 - Upload an image
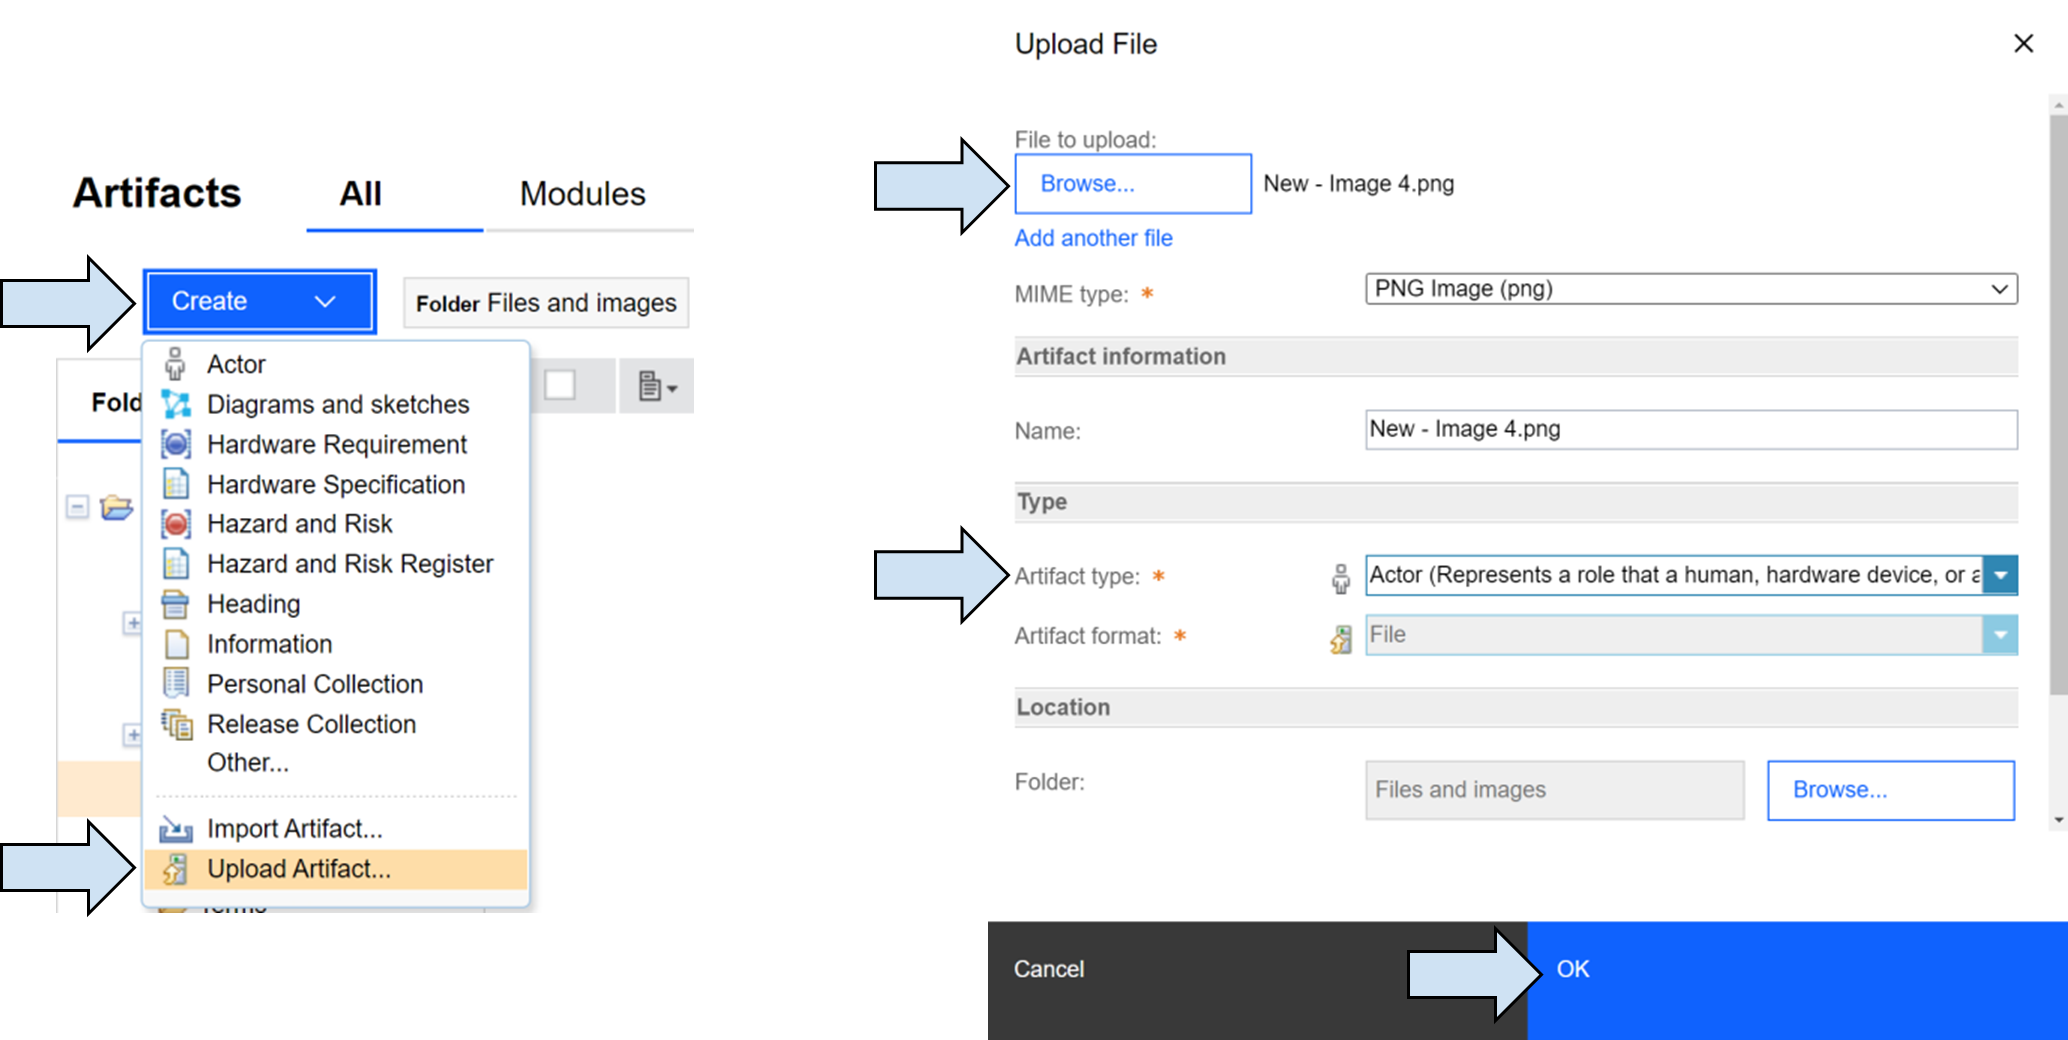
Navigate to the folder, click on the blue “Create” button and select “Upload artifact”. Alternatively, you can right-click on the folder, Create Artifact and Upload Artifact.
Next, click on browse and select any image on your computer. After that choose any “Artifact type” and click OK. In this simple example, artifact type is not important so you are free to choose any type.

15.) Upload an image
Now you should see your image in the folder.

16.) Image example
Step 3
At this step, our goal is to add our new image into the AMR Stakeholder Requirements Specification module as a new artifact, directly in the very first section, “Introduction”.
- Navigate to the AMR Stakeholder Requirements Specification module
- Right-click on the heading of the first section
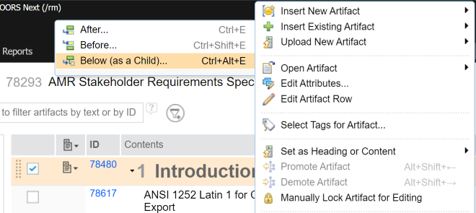
- Select - Insert Existing Artifact and choose “Below (as a Child)”

17.) Insert existing artifact
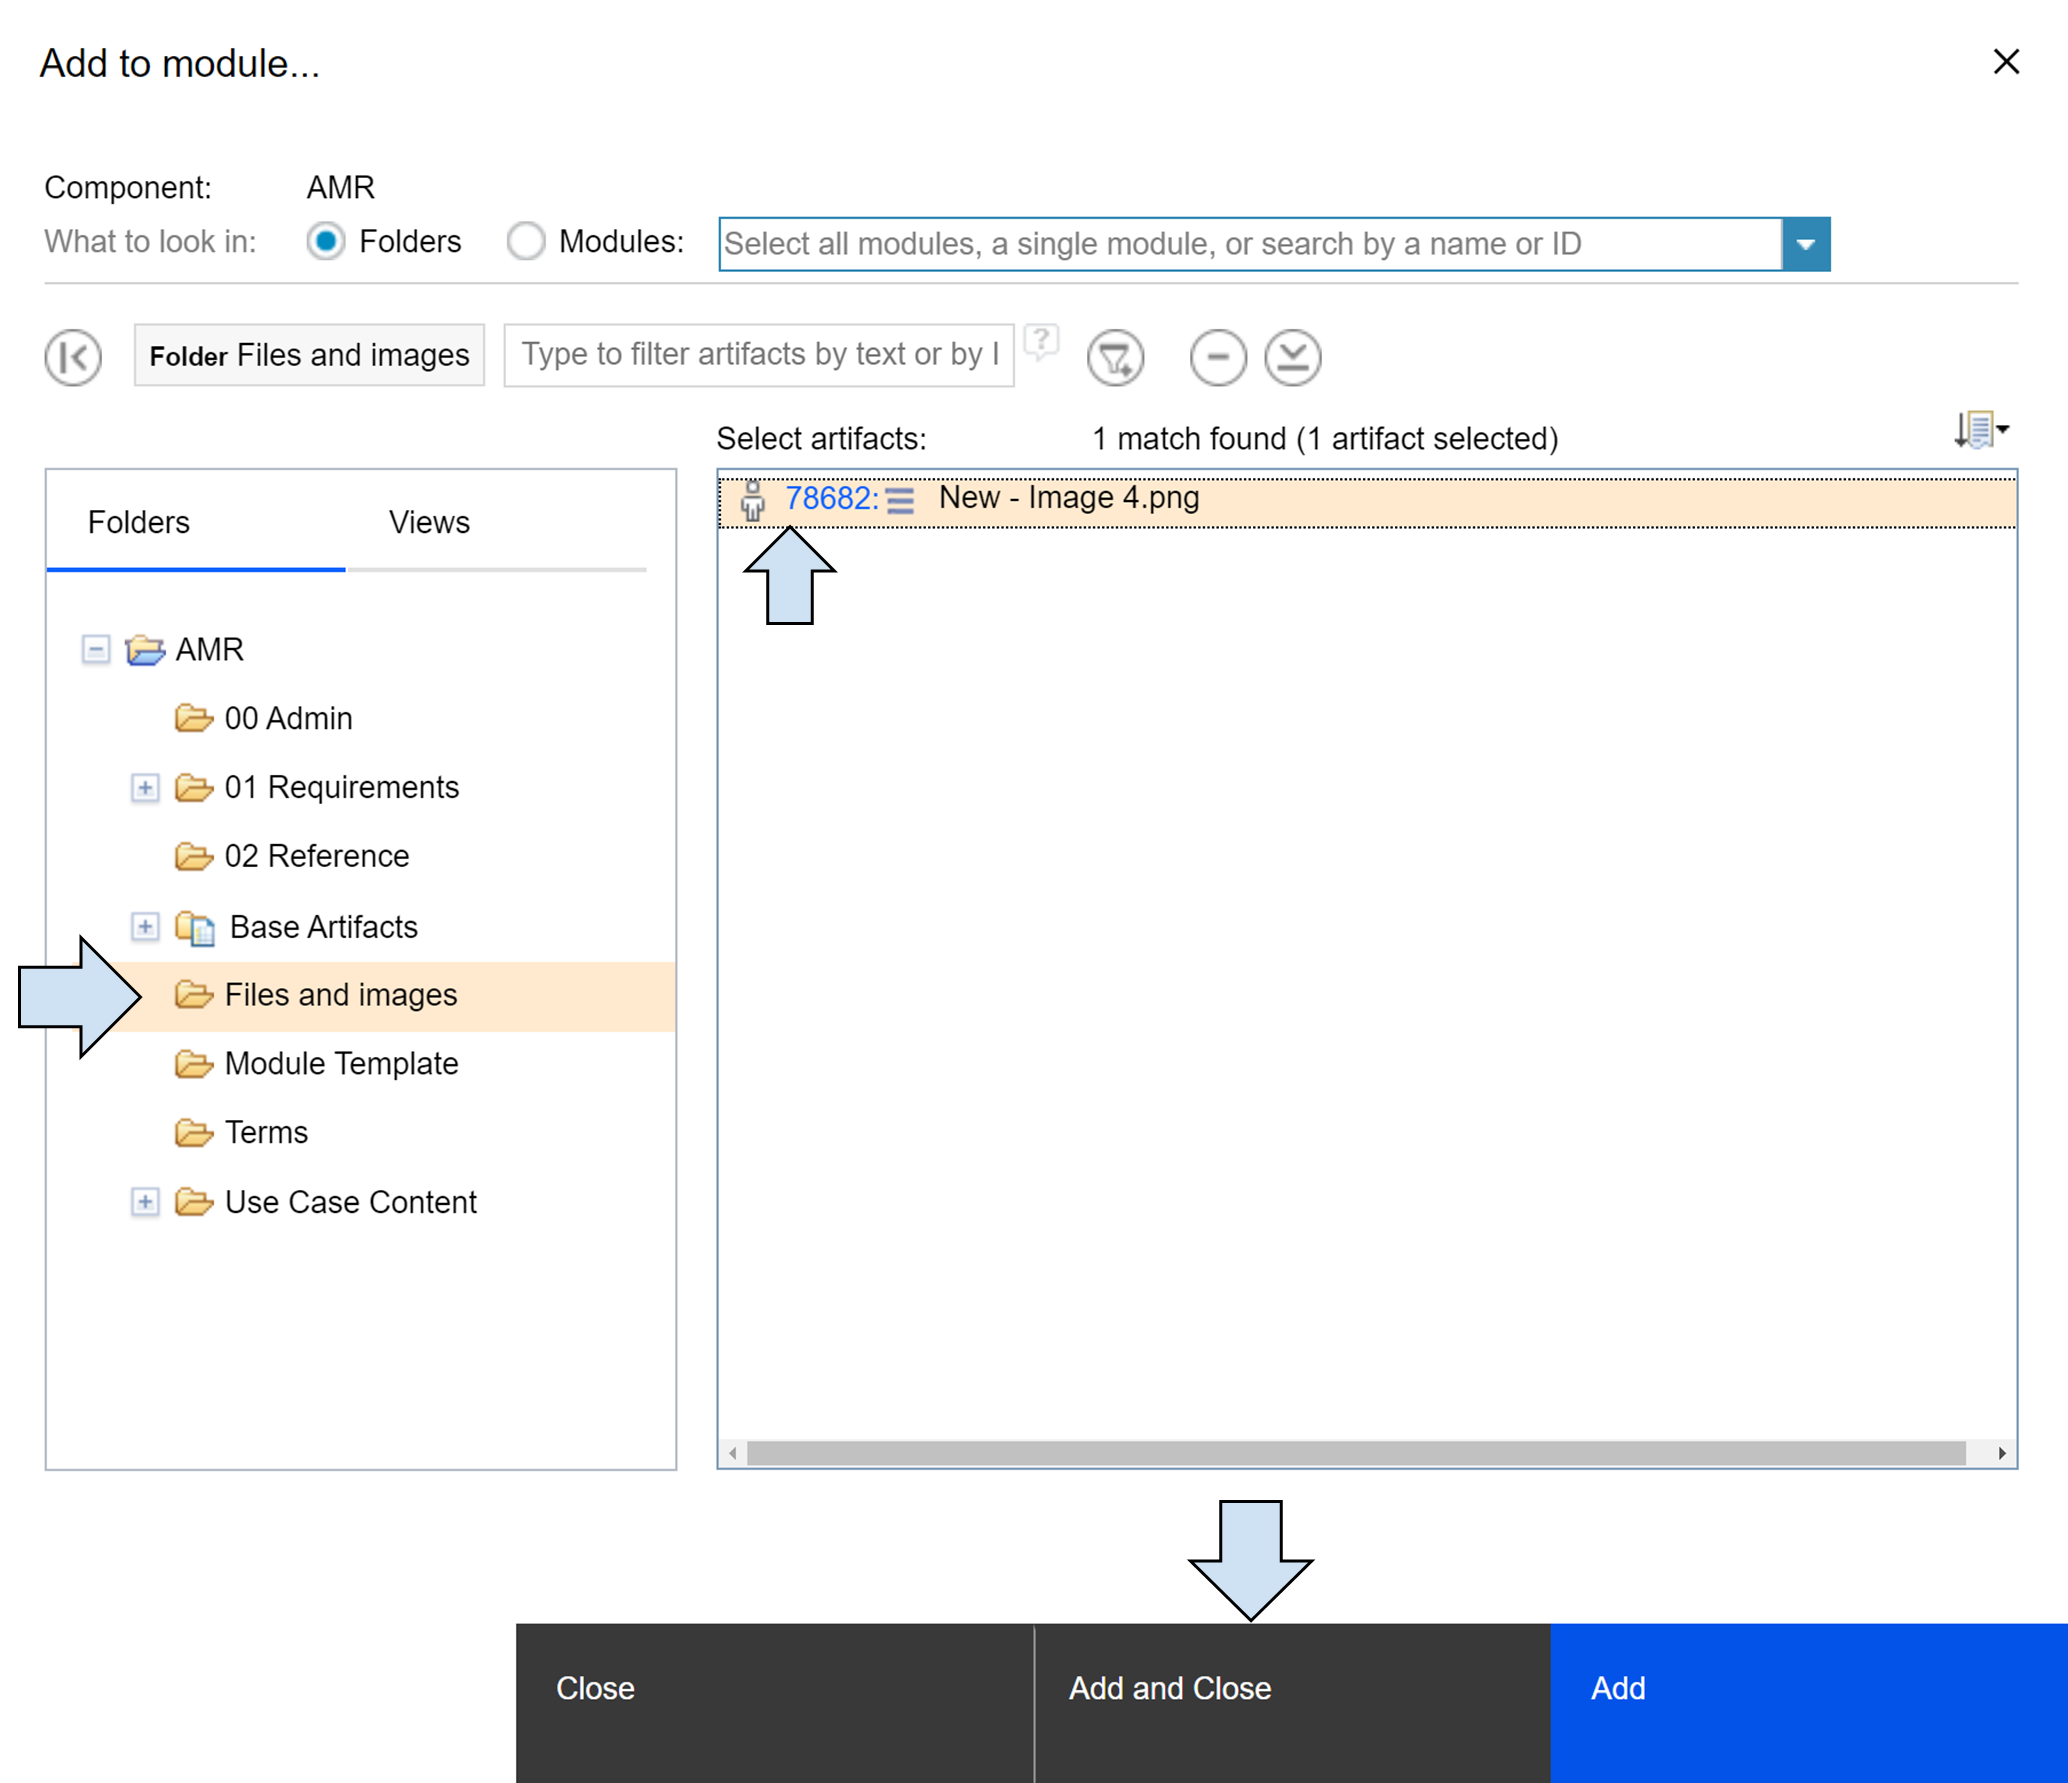
- Find “Files and images” folder
- Select the uploaded image and click “Add and close”

18.) Insert existing artifact - select artifact
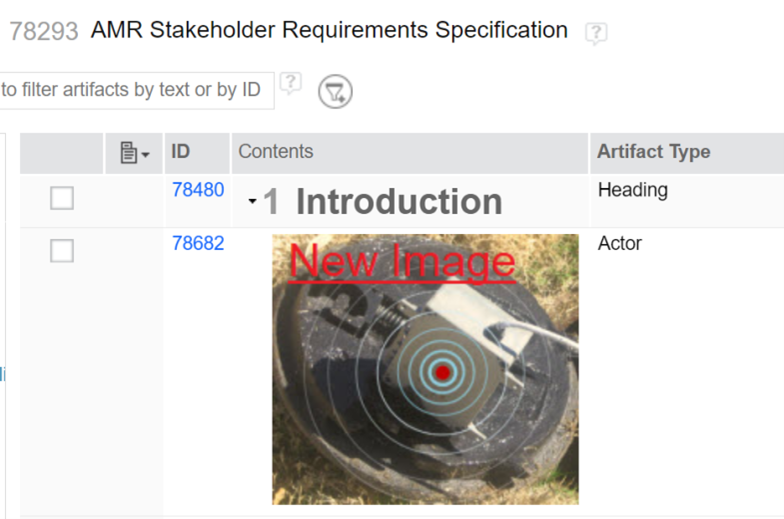
Now you should see the image in your module.

19.) Image in a module - example
Step 4
Before we explore the traceability of this image, let's use it again in the AMR System Requirements Specification module. This time, we will embed the image into the existing module artifact.
- Navigate to the AMR System Requirements Specification module.
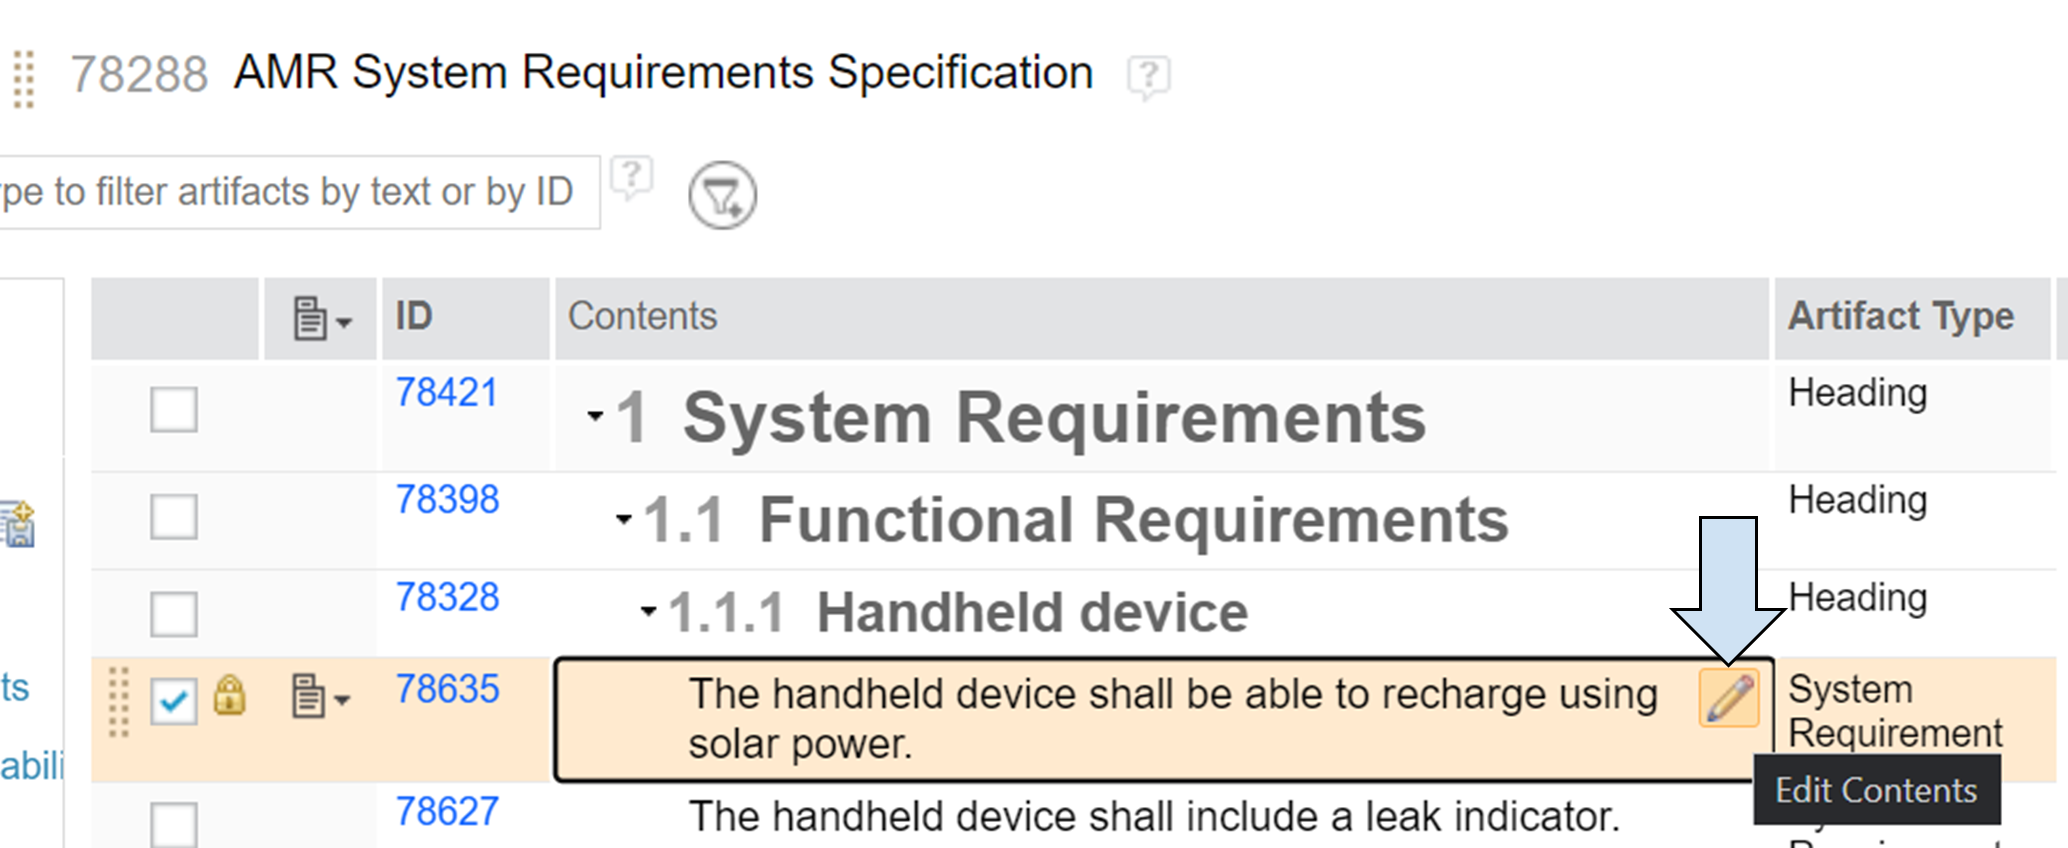
- Find the first stakeholder requirement and click on the pencil icon to edit the content.
- As in the rest of the scenario, the exact location is not important, we are using the first sections for simplicity and clarity.

20.) Edit contents
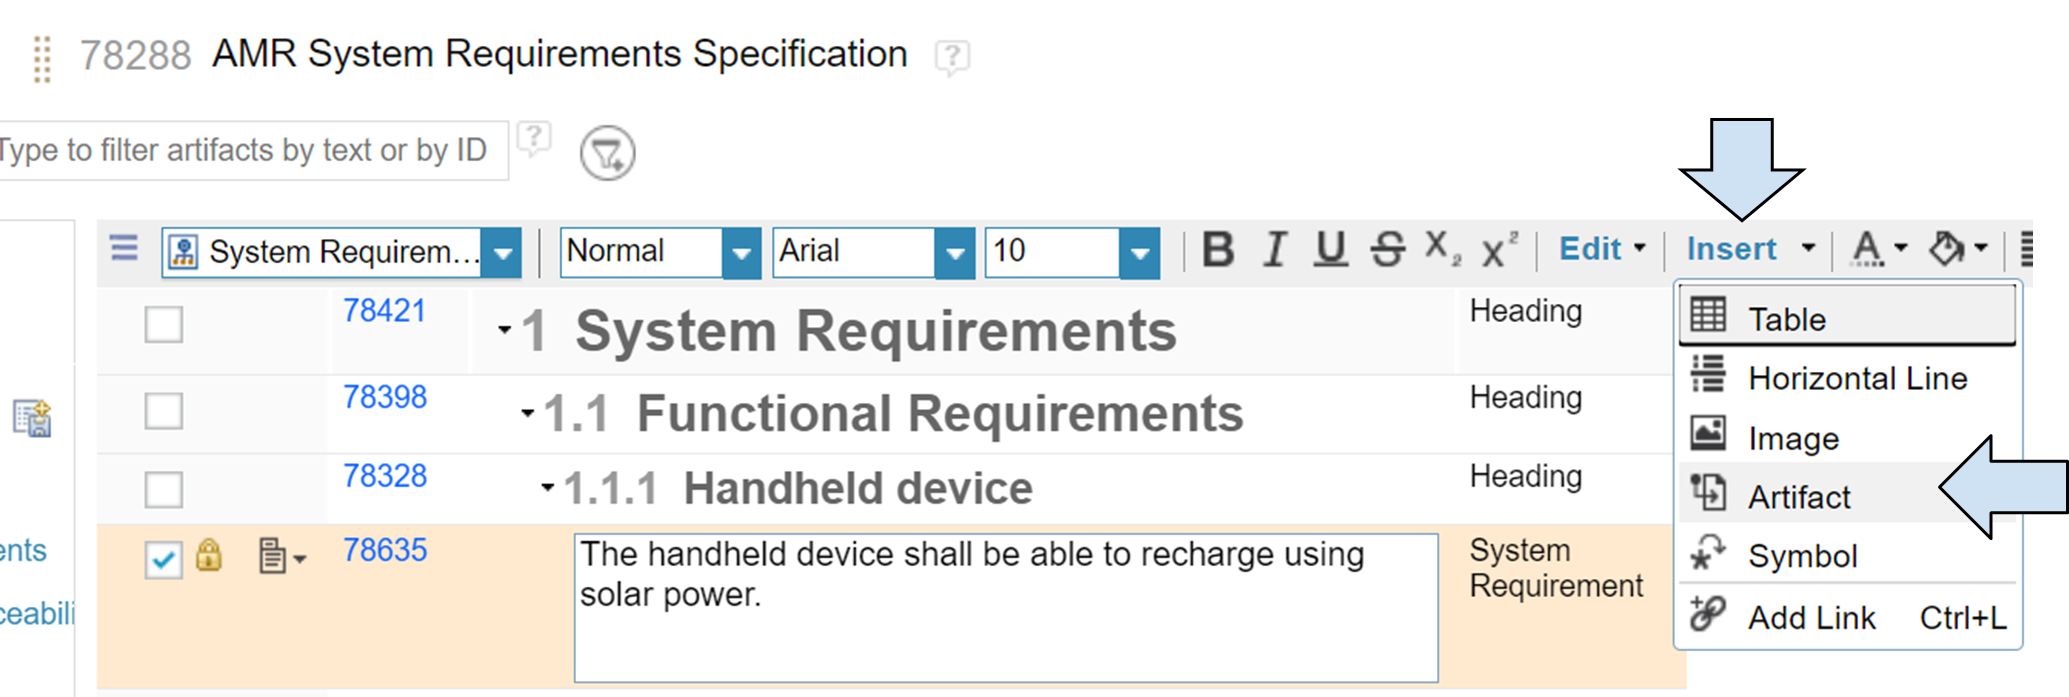
- Click “Insert” and choose “Artifact”

21.) Insert artifact
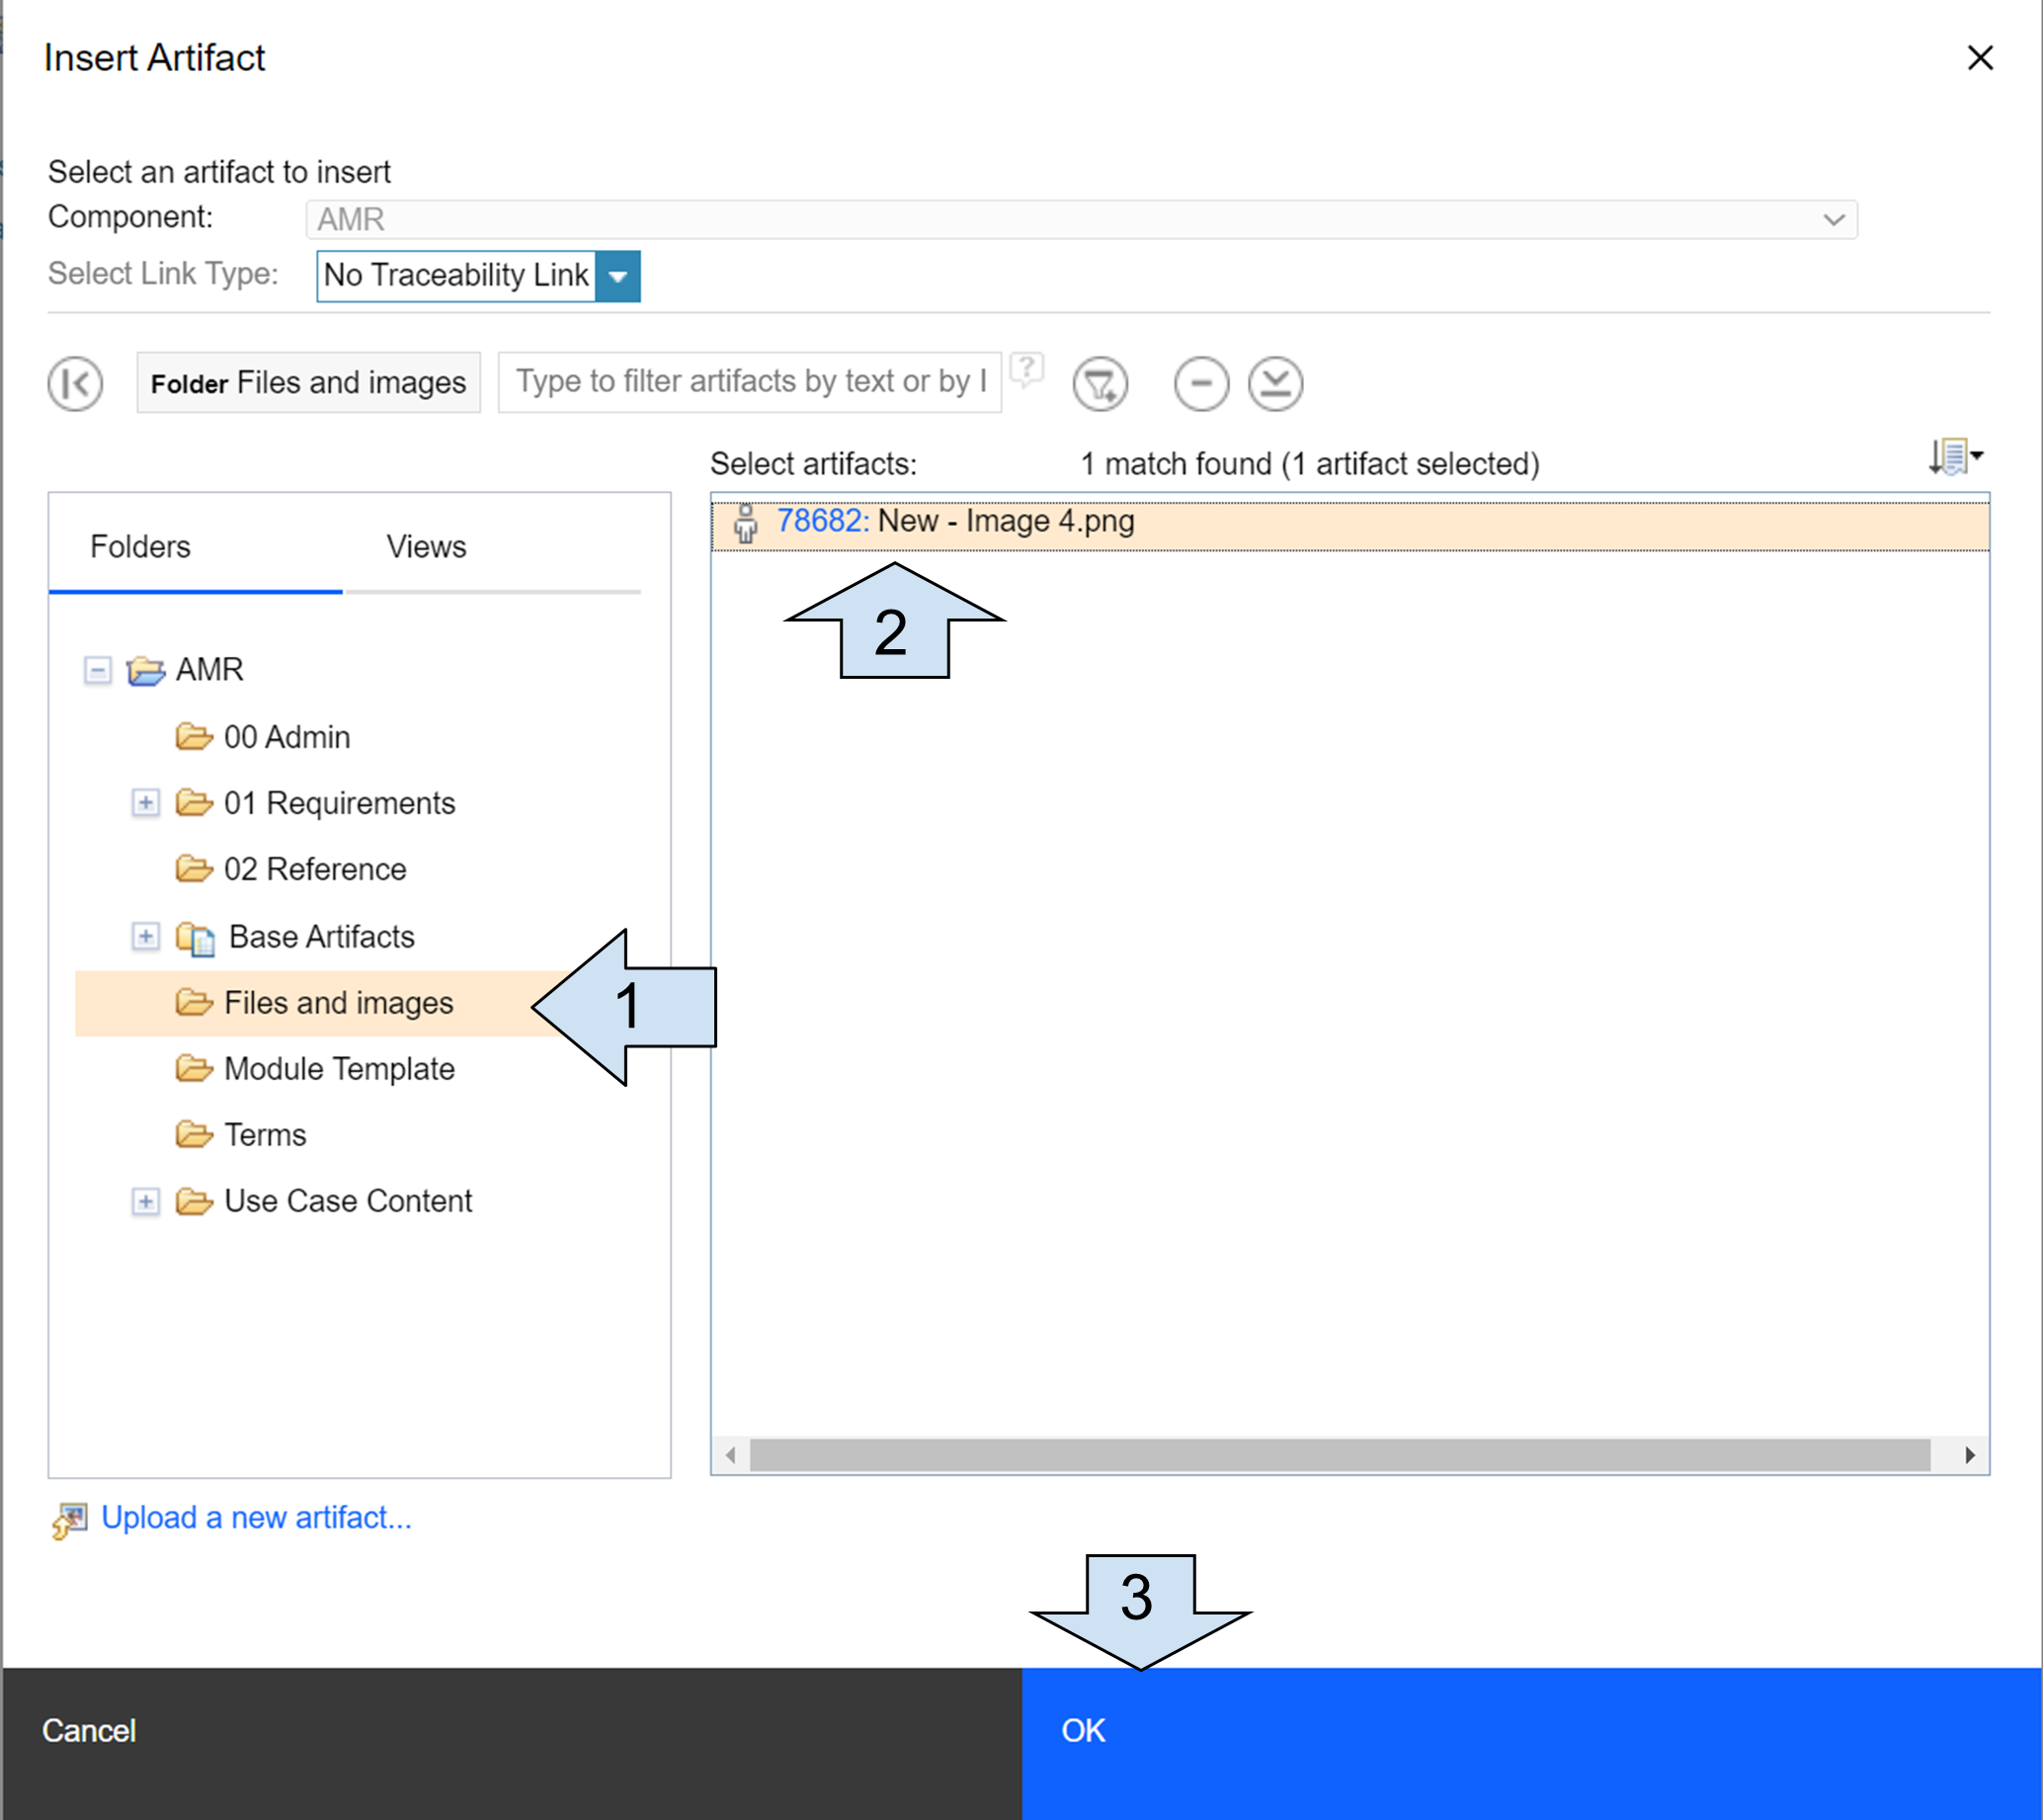
- Navigate to the folder with your image, select it and click OK. In this example, don’t change the Link Type.

22.) Insert artifact - selection
- Now you should see the image inserted into the artifact.
Step 5
Here, we will insert the image one last time into the third module. We will use the Requirements for Reuse module and we will insert the picture into the first stakeholder requirement artifact.
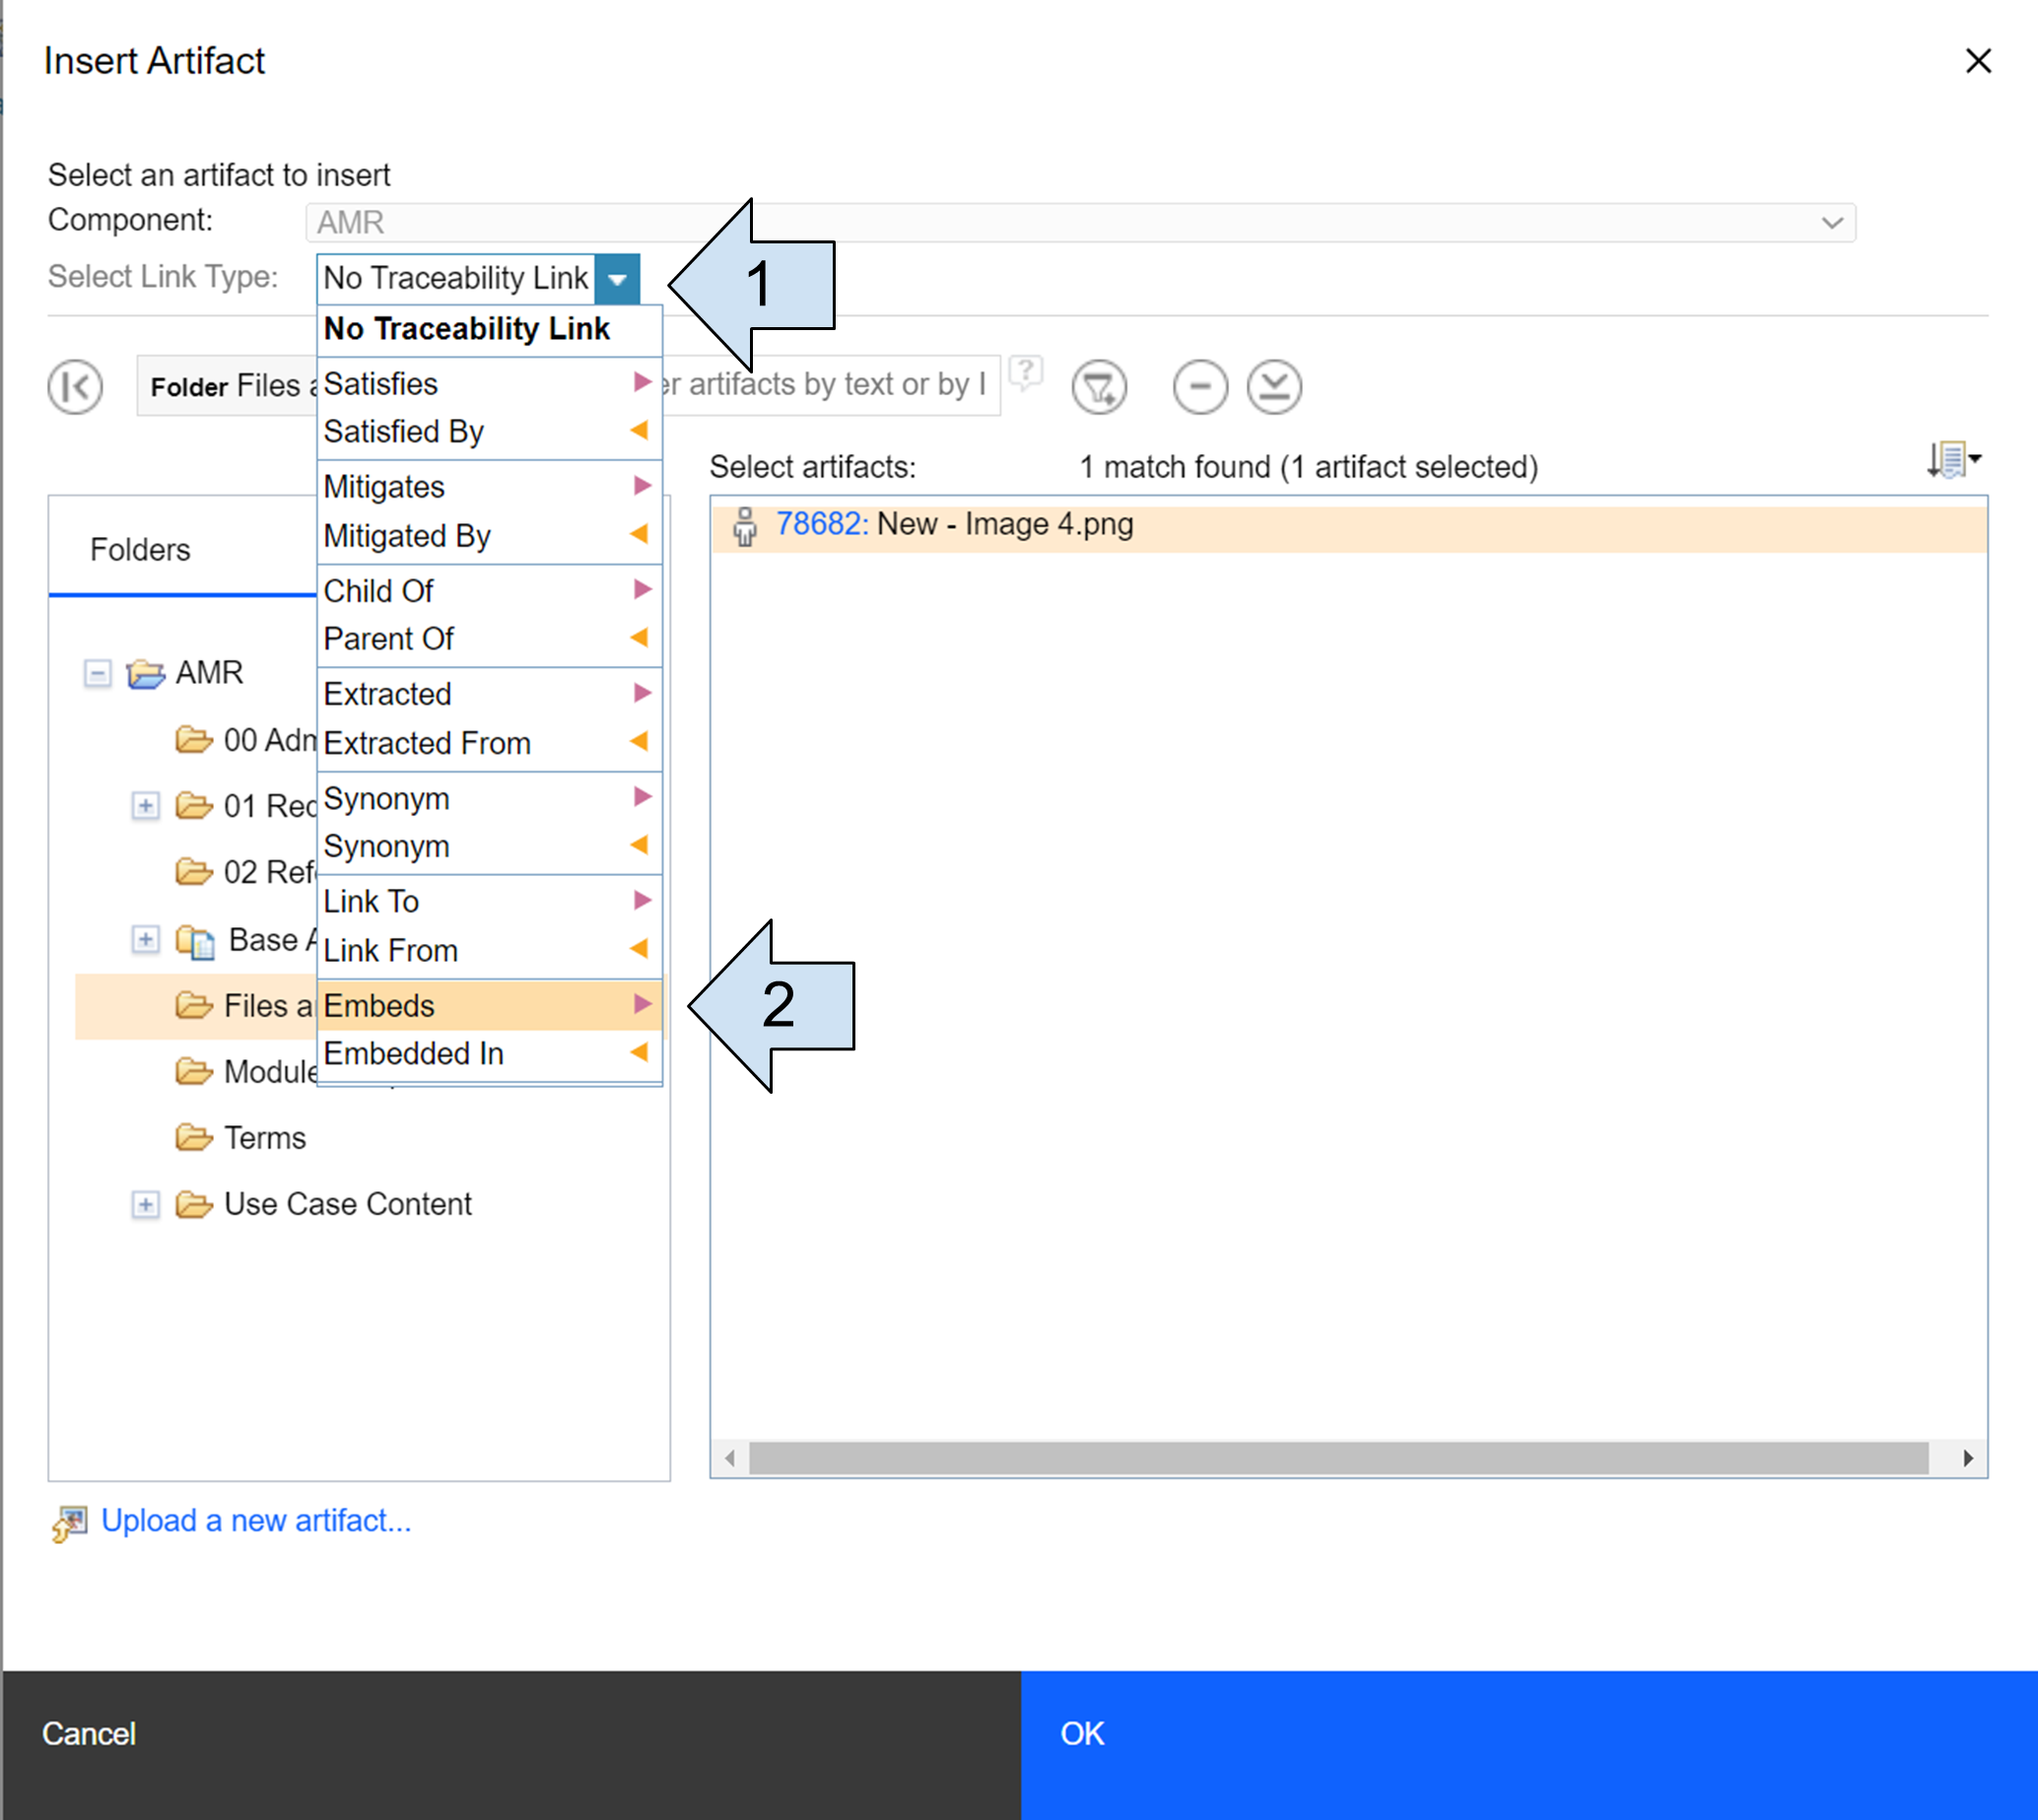
- Please repeat the process from step 4 with just one change - In the “Insert Artifact” window, click on “Select Link Type” and choose “Embeds”.

23.) Insert artifact - link selection
Step 6
Now that we have inserted the image into our modules in three slightly different ways, we are ready to check its traceability and discuss the best practices.
Observation 1
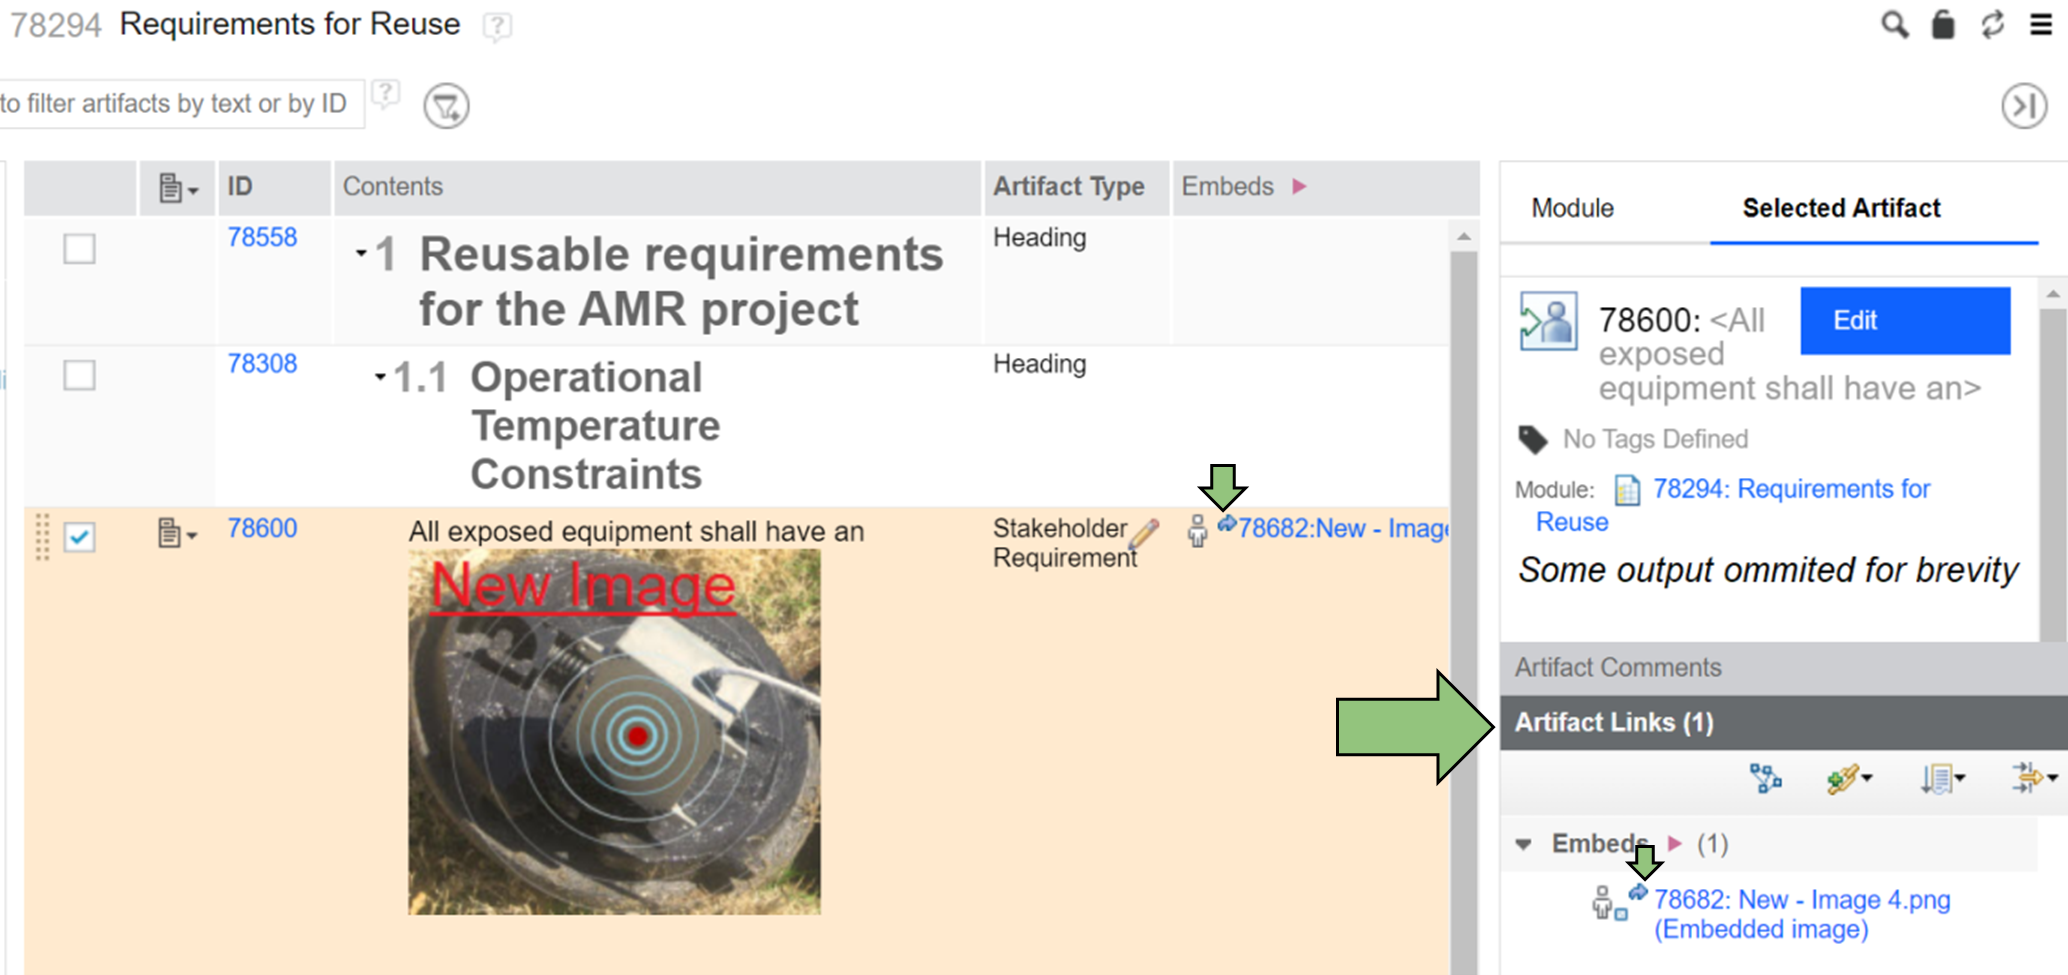
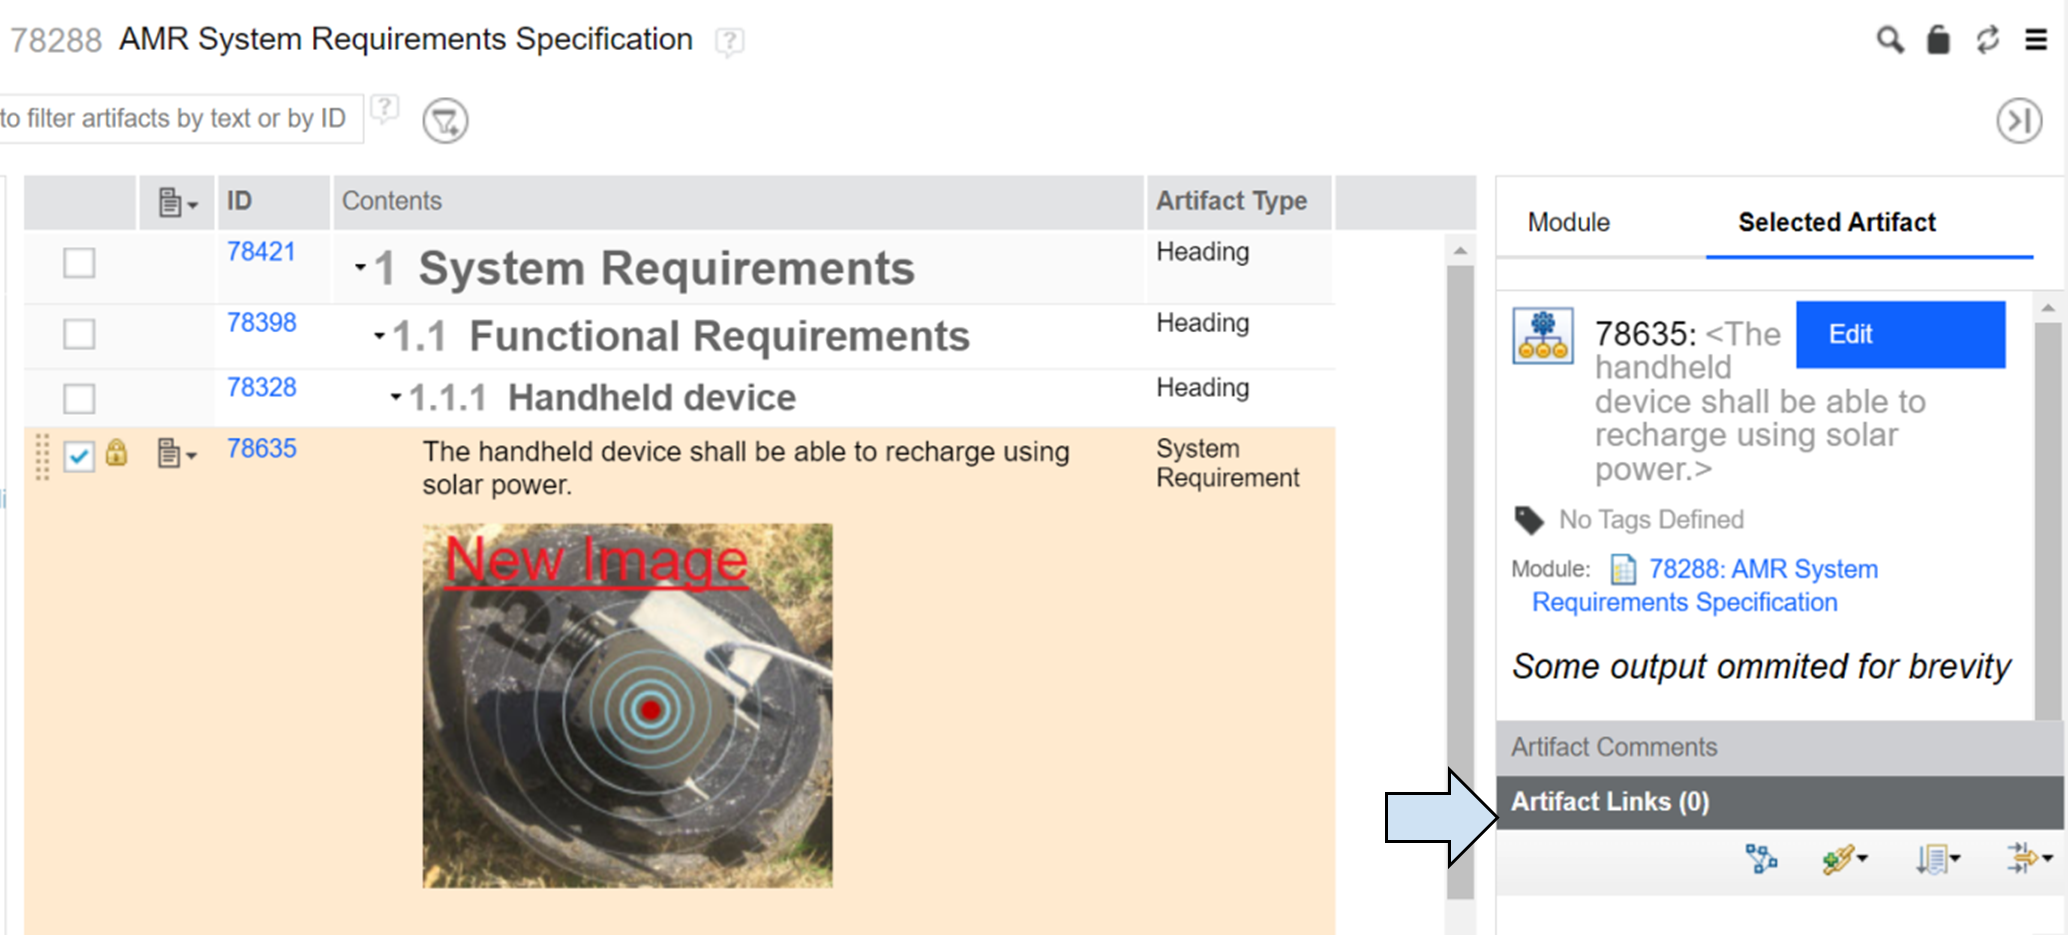
Continuing where we left off in step 5, check how the picture is embedded in the Requirements for Reuse module and AMR System Requirements Specification module. Artifact 78600 which embeds the picture now has an “embeds” link, while artifact 78635 which embeds the picture does not have any link. There are two important notes:
- Not having any associated link was by design, as we did not choose any traceability link.
- Second and more important note: Next to the embedded link you can see a small blue arrow, representing the fact that it is a base artifact link. There is no option to insert the picture as a module artifact, it will always require the use of a base artifact.

24.) Inserted artifact with link

25.) Inserted artifact without link
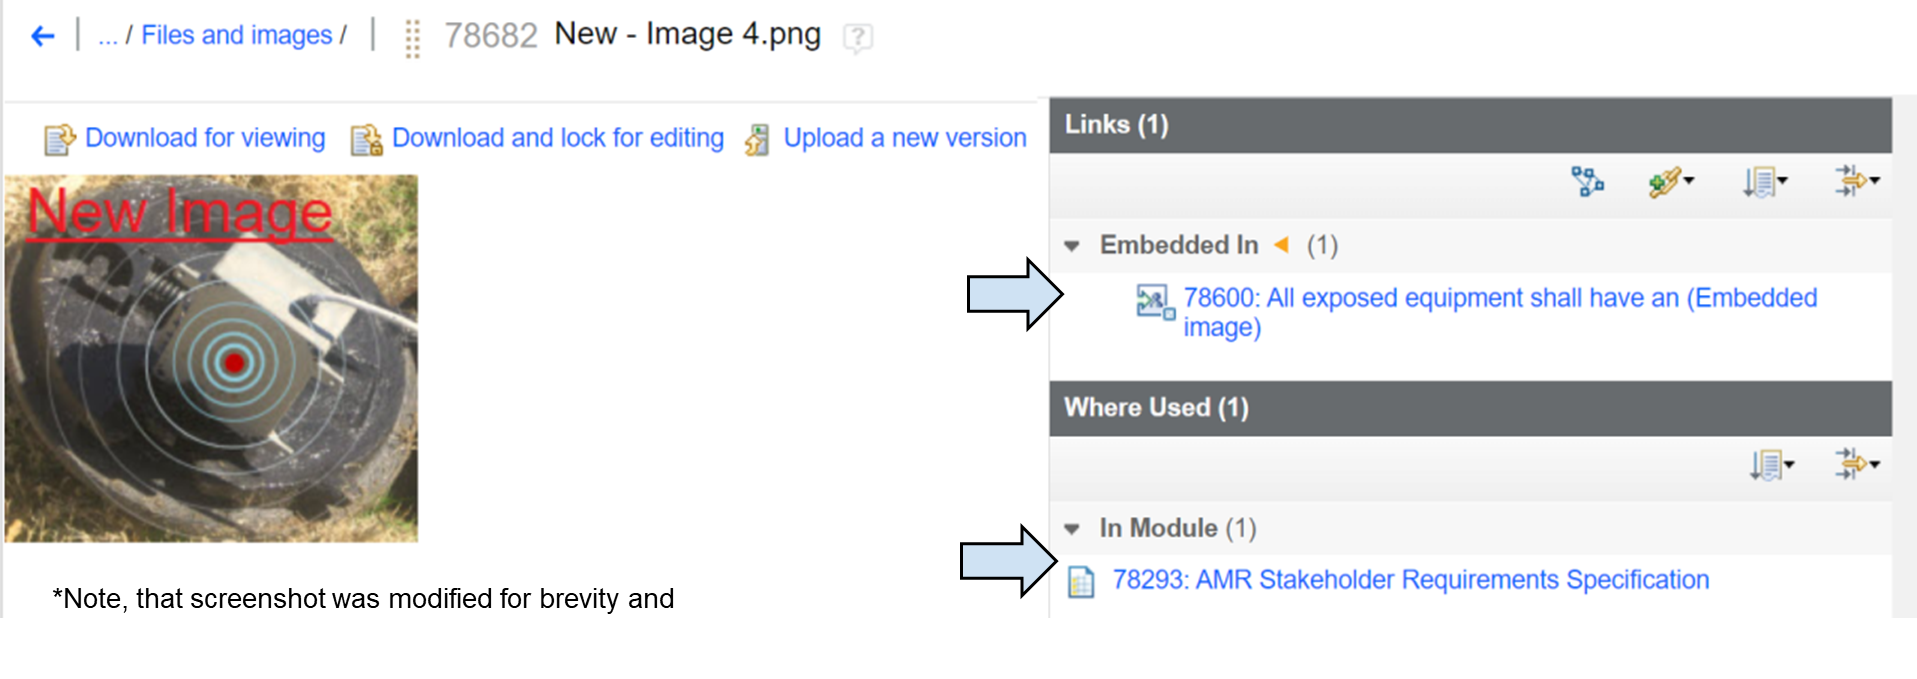
Observation 2
Click on the “embeds” link and jump to the base artifact. Here we find two very important sections that provide traceability - “Links” and “Where Used”. As you can see, although we used the image in three modules, we can trace its usage only to two of them.

26.) "Where Used" section
Not being able to trace the usage of any shared artifact could have serious implications. As a simple example - if we are not aware of any other uses and associations of an image (or any file) used in the AMR System Requirements Specification module, we can replace the image in the module with a new version of the image and suddenly, we have two different versions of the picture and no longer have a single source of truth.
As it is obvious from the observation, the best practice is to upload files as base artifacts to the folder structure and use traceability links any time the file is embedded into an artifact or module - even if you don't plan to reuse the file anywhere else - you never know where your complex project will lead you and it is not worth the risk.
Glossary terms
Doors Next provides a very useful capability of easily creating a glossary of terms and abbreviations. We included glossary terms in this article because of their unique capability - automatically creating a base artifact as well as a base link to this artifact.
To create a glossary term:
- Click on the pencil button to edit any artifact content that has an abbreviation you would like to create a term for - we will create the term for “IP”
- Highlight the abbreviation
- Click on the Term icon and select “Create term”

27.) Create term
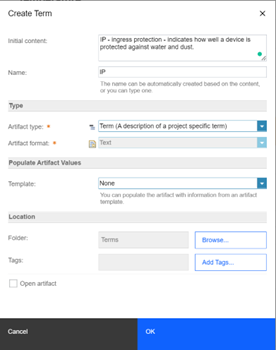
- Fill the fields according to the image below and click OK

28.) Create term - pop-up window
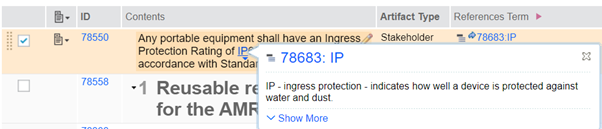
Now you can see that IP changed color to blue and a new link was added to the base artifact that was automatically created when creating the term. You could observe that creating the link did not require any user input and it was created automatically. Moreover, hovering the mouse above IP will show the rich hover with the glossary reference for IP.

29.) Created term
Sign up to our newsletter
Our Services
Our Extensions
Latest blog articles
Contact Us!
Softacus Services
We, at Softacus, are experts when it comes to consulting and service delivery of IBM software products and solutions in your business. We help our clients to improve visibility and transparency when licensing and managing commercial software, providing measurable value while increasing efficiency and accountability and we are providing services in different areas (see Softacus Services).
The IBM ELM extensions developed by Softacus are free of charge for the customers who ordered IBM ELM licenses via Softacus or for the customers who ordered any of our services. If you are interested in any of our IBM ELM extensions, you found a bug or you have any enhancement request, please let us know at info@softacus.com.
