Introduction
A lot of times when building a particular report (document) we are forced to query the same collection of data multiple times because we want to have different representations of that collection in the document.
For example, in one document, we want to have the first section with all Effective use cases and at the end of the document, we want to have the list of all use cases that are still in Draft state.
App Versions Used:
-
DNG version: 6.0.6.1
-
RPE/RRDG version: 6.0.6.1
Challenge: DNG Reportable API is quite limited
The biggest challenge in DNG Reportable API is that there is not always the possibility to filter a particular collection of artifacts based on some attribute or group of attributes. That’s why we need to perform the filtering on the RPE side.
Link to DNG Reportable API: https://jazz.net/wiki/bin/view/Main/DNGReportableRestAPI
1. The traditional way - querying data multiple times
The common approach to build such a document will be to query the same collection multiple times and to implement a different filter each time. As I’ve mentioned earlier, the filter will have to be implemented in RPE as a script expression because DNG Reportable API does not provide the ?fields= filtering param;
Here is how the Use Case looks like in DNG (DOORS Next Generation). The custom attribute that we need to use for filtering UCs is State (UC)
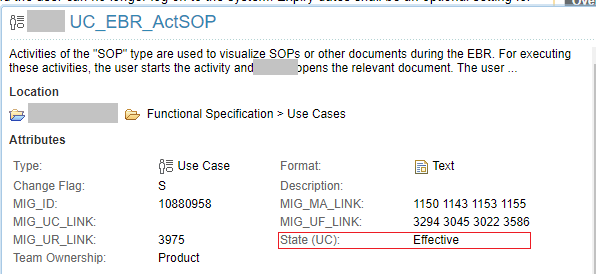
1.) Use Case artifact in DNG
Build the first section (Effective UCs)
What we need to do first in RPE is to query the collection of UCs and first to display only those UCs that are effective ( State(UC)==” Effective” ).

2.) Query UC artifacts
For each UC artifact, we need to get the custom attribute State (UC) and to check if the value of this attribute is “Effective”.
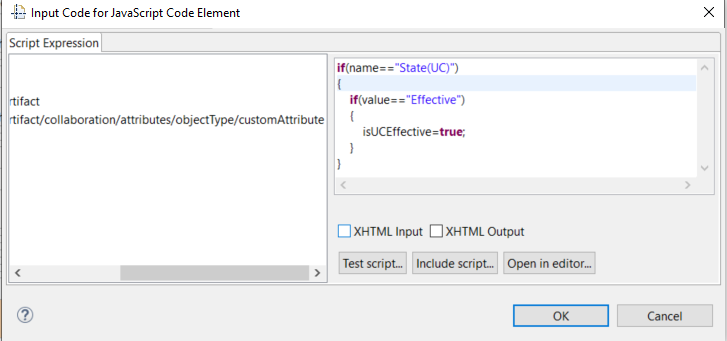
3.) Use javascript to determine if a UC is in an Effective state
The last thing that we need to do is to use a condition and to check if the UC is Effective or not. For this we’ll use the value saved in the isUCEffective variable (boolean value);
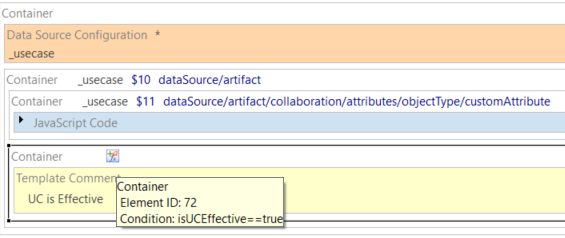
4.) RPE condition to filter only the Effective use cases
In the selected container we will display all the information that is requested in the report for that UC. We know that because of the condition that is placed on the container, only the UC with State(UC)==” Effective” will be processed.
Build the second section (Draft UCs)
To build the second section of the document with all the UCs that are in State (UC)==” Draft” all we need to do is replicate the same template structure, to query again the collection but in this case to build a different condition.
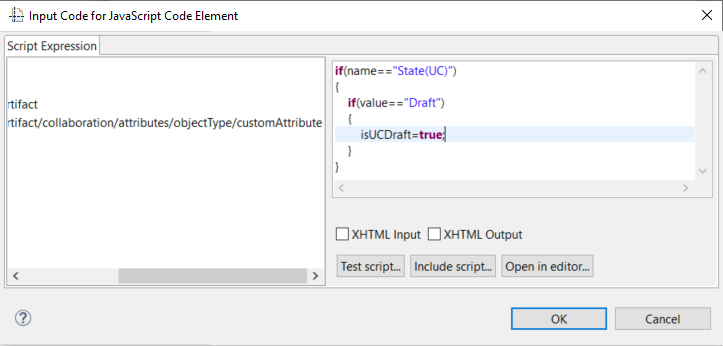
5.) Use javascript to determine if a UC is in Draft state
The second section in the RPE template will look like this:
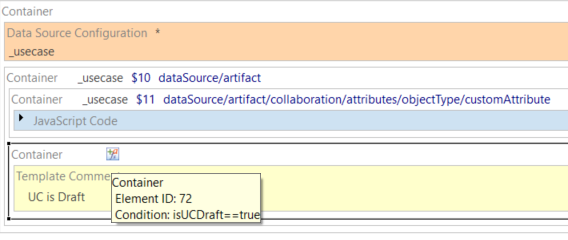
6.) Iterate Draft UCs
This way, we can obtain 2 different representations of the same collection of artifacts by iterating twice the same data but using a different filter each time.
Performance
There is anything that we can do to decrease the execution time in this case? This is what I’ll try to solve in the second part of this article.
As we know RPE is using javascript to build the logic inside the template (filters, conditions, text processing, etc), but can be also used to store the data in memory for later processing. I’ll use this second scenario, to request only once all UCs from the server and to store them in memory (in one big array). Then I’ll iterate internally the UC array and filter the UCs based on the State (UC) attribute.
Instead of requesting the same collection of UCs multiple times from the server (bad performance because of the slow request time from the server), I’ll read the UCs once and I’ll process the collection from memory multiple times.
2. Using arrays - load data in memory and process multiple times
To be able to determine the performance of this report, we’ll simulate a real-case scenario:
Number of artifacts in collection: 500 UCs
Number of requests to server: 500x2=1000 (1 req for each UC)
Avg req time: 0.4s
Total execution time: 1000x0.4s =400s
Note: Now think even further, and imagine that you need to add another section in the document with all UCs that are under review and so on. Each new iteration will add an extra 200s to the final generation time.
Load UCs collection in memory
The first part of the RPE template will be identical to what we've built in the first scenario. We need to iterate all UCs, but this time instead of filtering them we are saving all UCs in an internal array.
Note: Each UC object will have to contain all the information that will be displayed in the final document. Because we need to filter the collection based on the State (UC) attribute, we’ll have to add this attribute also.
So in the end we are looking to save for each UC the title, content, and state attributes.
To store the UCs we need to define an internal variable in RPE that will act like an array.
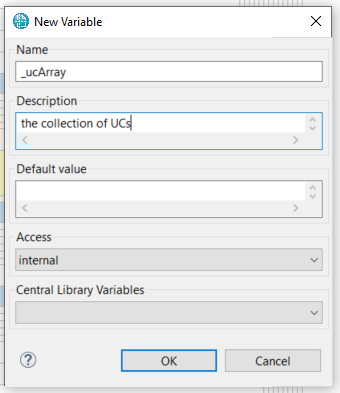
7.) Define _ucArray internal variable
Before starting to iterate through all UCs we’ll have to initialize our array.
![_ucArray=[]](/images/Products/IBM/ELM/EPE/Load data in memory - work with arrays in RPE/08_Array initialization.png)
8.) Array initialization
Now the _ucArray is initialized, so we can store UC objects in it. When we are iterating the UCs, for each UC artifact we are creating a UC object that is pushed into the array. At the end of the iteration, our array will contain all UCs from the collection.
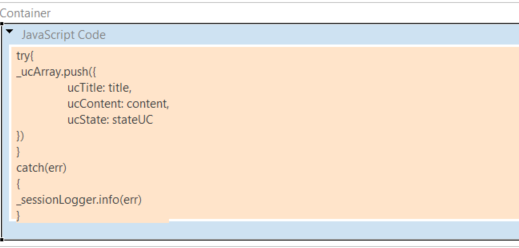
9.) Create a UC object and push it to the array
Iterate arrays
Now to recreate the Effective and Draft UC sections will have to iterate the _ucArray twice and use the state property to filter the content.
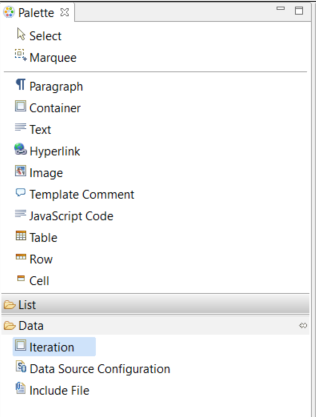
10.) Iteration element in the RPE Palette
To iterate an array of elements, RPE provides a special element called Iteration (Palette->Data->Iteration). This Iteration element is acting like a DO/WHILE block, where we’ll have a re-iteration as long as the condition is still true.
To iterate our _ucArray, we insert the Iteration element and we check in the condition that the number of processed elements is less or equal to the array size. For this, we are using an internal variable that acts like a counter (to count the processed elements). After each iteration, the counter is increased by +1.
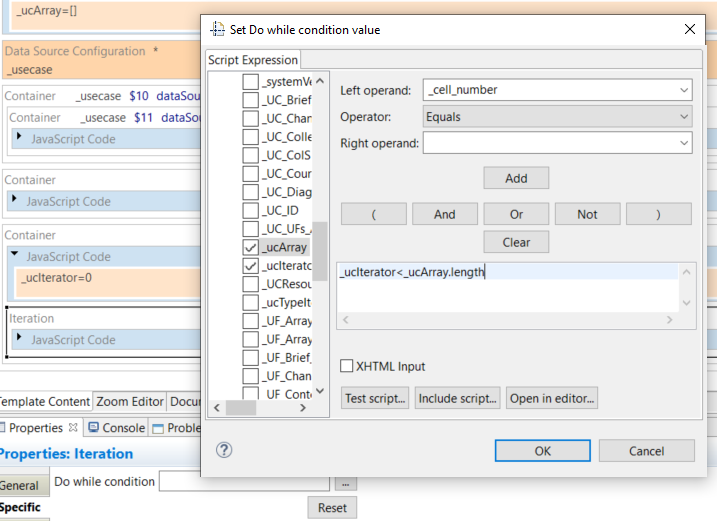
11.) DO/WHILE condition
All we need to do now is to filter the UCs based on the ucState attribute.
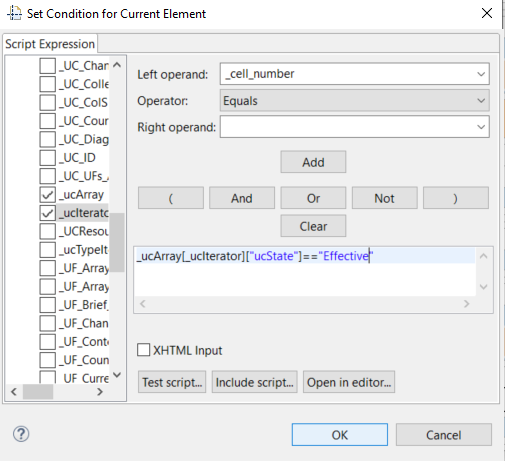
12.) Using UC object property in a condition
To implement the other sections, we need to reiterate the _ucArray (which is load in memory) and to change the condition. This way no other requests are done to the server and the execution time will decrease considerably.
Performance
Because the UC collection was loaded in memory we have a reduced number of requests performed to the server
Number of artifacts in collection: 500 UCs
Number of requests to server: 500=500 (1 req for each UC)
Avg req time: 0.4s
Extra javascript processing time: 5s
Total execution time: 500x0.4s +5s =205s
Softacus Services
We, in Softacus, are experts when it comes to consulting and service delivery of IBM software products and solutions in your business. We help our clients to improve visibility and transparency when licensing and managing commercial software, providing measurable value while increasing efficiency and accountability and we are providing services in different areas (see Softacus Services).
IBM ELM extensions developed by Softacus are free of charge for the customers who ordered IBM ELM licenses via Softacus or for the customers who ordered any of our services. If you are interested in any of our IBM ELM extensions, you found a bug or you have any enhancement request, please let us know at info@softacus.com.
Related and Referenced Topics
Blog Articles:
Basics of Links and Link Types in IBM DOORS Next Generation - learn the basics about the linking and link types in IBM DOORS Next.
Linking Techniques in IBM DOORS Next - article explaining basic concepts and showing multiple ways of creation of links between artifacts.
Link By Attribute Feature in IBM DOORS Next - the article explains how to use the "Link by attribute" function to automatically create, update, or delete one or more links between artifacts based on values in the attributes of the artifact.
Softacus Widgets:
Link Switcher - widget developed by Softacus, that converts the context of artifacts links in a very short time.
Module Link Statistics - extension that provides users with a quick overview of the amount of the links in specific link types in a module.
Link Type Change- extension developed by Softacus designed to enhance the functionality of DOORS Next Generation by allowing users to manipulate the direction of a link or convert it to another type of link.
Links Builder- extension that allows the users to create a link between two artifacts in DOORS Next Generation according to the certain rules.
Link by Foreign Attribute - this extension allows users to create links between artifacts in the selected module(s), based on the attributes values.
Show Attributes of Linked Artifacts - this extension shows the attributes and links of the artifact that is currently selected.
